AdvancedRepeaterForm Component Documentation
English Version
1. Overview
TheAdvancedRepeaterForm is a powerful and highly configurable Vue.js component designed to manage a list of items within a table. It provides a complete, self-contained CRUD (Create, Read, Update, Delete) interface with multiple UI modes (Panel, Modal, Inline-edit).
Its key features include:
- Flexible Data Display: Renders items in a table format.
- Multiple Edit Modes: Supports top-panel, modal, and inline editing.
- CRUD Operations: Built-in functions for adding, editing, and removing items.
- Customizable Forms: Uses a scoped
formslot to inject any form layout. - Customizable Cells: Uses a
cellslot for custom rendering of table data. - External Validation: A
validatorprop allows hooking into parent-level validation libraries like VeeValidate. - Event-Driven: Emits events (
onformchange,onitemchange) for parent components to react to state changes. - ACL Integration: Props like
canAdd,canEdit,canDeleteallow easy integration with backend permission systems to control user actions. - Advanced Features: Includes reordering (drag-and-drop), import/export, and DMS integration hooks.
2. Core Concepts
The component is designed to be configured from a parent Vue instance, often generated by a backend system (like Laravel with YAML definitions).- Backend-Driven Configuration: The component’s props and behavior are typically defined in a YAML file on the server. The server-side code (e.g., a Blade template) reads this YAML and renders the
<advanced-repeater-form>tag with the appropriate props. - Data Binding: The main list of items is passed via the
:items.syncprop. Any changes made inside the repeater (add, remove, reorder) will automatically update the parent’s data. - Form Injection: The form for creating/editing items is not part of the repeater. You must provide it via the
#formslot. This gives you complete control over the form’s layout, fields, and components. - Scoped Slot
formObject: The#formslot provides a crucial property calledformObject. This is a reactive reference to the item currently being edited. Any changes you make toformObjectin your slotted form are instantly reflected in the repeater’s state. This is the key to dependent field calculations. - Validation: Validation is handled by the parent. You wrap your slotted form in a
ValidationObserverand pass a validation function to the repeater’s:validatorprop.
UI
Default Basic

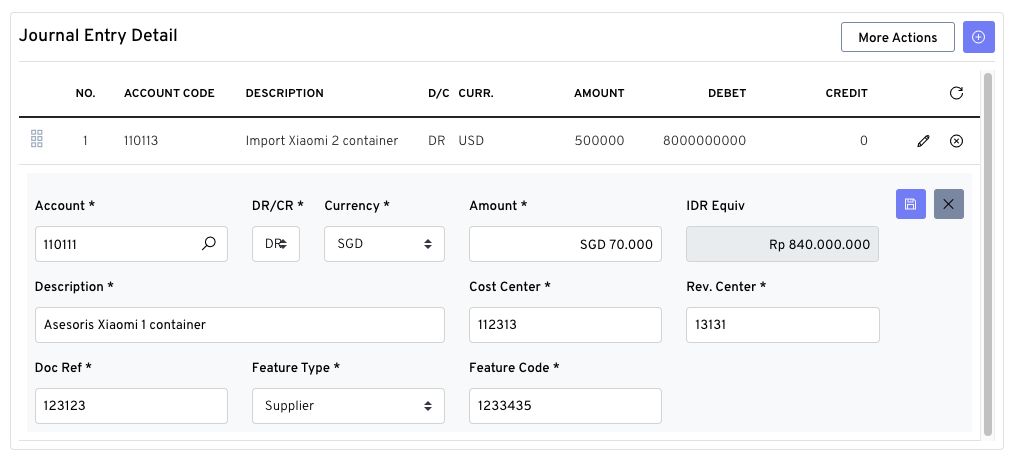
Inline Item Editing
3. Props
4. Slots
5. Implementation Guide
Here is a step-by-step guide based on your provided example.Step 0: Backend Configuration (YAML)
Configuration begins on the server. A YAML file defines all the necessary props for the component. The backend will parse this file to render the component tag in the Blade view.Step 1: Parent Component data Setup
In your parent Vue component’s data option, define the properties that correspond to the model and objectDefault in your YAML.
Step 2: Parent Component methods Setup
Define the methods that will handle validation, calculations, and events, matching the names in your YAML.
Step 3: Slotted Form Template
Your form template (defined inform_template in YAML) should contain the ValidationObserver and the event listeners.
Bahasa Indonesia
1. Gambaran Umum
AdvancedRepeaterForm adalah komponen Vue.js yang andal dan dapat dikonfigurasi, dirancang untuk mengelola daftar item dalam tabel. Komponen ini menyediakan antarmuka CRUD (Create, Read, Update, Delete) yang lengkap dengan beberapa mode UI (Panel, Modal, Inline-edit).
Fitur utamanya meliputi:
- Tampilan Data Fleksibel: Merender item dalam format tabel.
- Mode Edit Beragam: Mendukung pengeditan melalui panel, modal, dan inline.
- Operasi CRUD: Fungsi bawaan untuk menambah, mengedit, dan menghapus item.
- Formulir Kustom: Menggunakan
slotformuntuk menyisipkan tata letak formulir apa pun. - Sel Kustom: Menggunakan
slotcelluntuk kustomisasi rendering data tabel. - Validasi Eksternal: Properti
validatormemungkinkan koneksi ke pustaka validasi di level induk. - Berbasis Event: Mengirimkan
event(onformchange,onitemchange) agar komponen induk dapat bereaksi. - Integrasi ACL: Properti seperti
canAdd,canEdit,canDeletememungkinkan integrasi mudah dengan sistem perizinan di backend untuk mengontrol aksi pengguna. - Fitur Lanjutan: Termasuk pengurutan ulang (drag-and-drop), impor/ekspor, dan lainnya.
2. Konsep Inti
Komponen ini dirancang untuk dikonfigurasi dari instance Vue induk, yang sering kali dihasilkan oleh sistem backend (seperti Laravel dengan definisi YAML).- Konfigurasi Berbasis Backend: Properti dan perilaku komponen biasanya didefinisikan dalam file YAML di server. Kode sisi server (misalnya, template Blade) membaca YAML ini dan merender tag
<advanced-repeater-form>dengan properti yang sesuai. - Data Binding: Daftar item dioper melalui properti
:items.sync. Perubahan di dalam repeater akan secara otomatis memperbarui data di induk. - Injeksi Formulir: Formulir untuk membuat/mengedit item disediakan melalui
slot#form, memberikan kontrol penuh atas tata letak formulir. - Scoped Slot
formObject: Slot#formmenyediakan propertiformObject, sebuah referensi reaktif ke item yang sedang diedit. Ini adalah kunci untuk kalkulasi bidang yang saling bergantung. - Validasi: Validasi ditangani oleh induk. Anda membungkus formulir slot dengan
ValidationObserverdan memberikan fungsi validasi ke properti:validator.
3. Properti (Props)
4. Slot
5. Panduan Implementasi
Berikut adalah panduan langkah demi langkah berdasarkan contoh Anda.Langkah 0: Konfigurasi Backend (YAML)
Konfigurasi dimulai di server. File YAML mendefinisikan semua properti yang dibutuhkan komponen. Backend akan mem-parsing file ini untuk merender tag komponen di view Blade.Langkah 1: Pengaturan data Komponen Induk
Di dalam opsi data komponen Vue induk, definisikan properti yang sesuai dengan model dan objectDefault di YAML Anda.
Langkah 2: Pengaturan methods Komponen Induk
Definisikan method yang akan menangani validasi, kalkulasi, dan event, sesuaikan namanya dengan yang ada di YAML.
Langkah 3: Template Slot Formulir
Template formulir Anda (didefinisikan diform_template dalam YAML) harus berisi ValidationObserver dan event listener.